Table Talk: Playing Efficiently as the Defender

Earlier I had talked about building your frames and using them efficiently. But how do you utilize that knowledge on the table? Here are a few tips for playing efficiently as the defender.

1. Denial, denial, denial.
When you’re deploying your stations on the table before anyone else, you may be tempted to put them in a corner somewhere so that there is only one angle of attack. Don’t give in to that temptation. One of the biggest advantages you have as the defender is area denial. You opponents are not allowed to deploy within direct fire range of your stations, make sure to use that to your advantage. Try to place your stations so that your entire defensive perimeter is actually on the table, if your stations are too close to a table edge you are wasting a valuable asset. Also, find the most advantageous place on the table and make sure your opponents can’t deploy there. Force them to deploy either in a large open killzone, or force them to move through one to get to you.

image

These are weapons in your arsenal, make sure you learn to use them.

2. Sometimes the best defense…
…Is to not defend at all. Remember that station you used to deny a huge chunk of the table to your opponents? That one right next to, or better yet, in the middle of that big open killzone? Don’t try to defend it, let the other guys fight over it. As your opponents move towards that juicy station you’re dangling in front of them, fall back and let them take it. Chances are if you lose that station you won’t be in the lead anymore, and then you won’t have two people gunning for you anymore. This is called the fade maneuver and it is pretty much essential to win as the defender on the regular.

3. Premature Activation
Having the highest score at the beginning of the game, and thus the initiative can be a bit tricky. You have the capability to activate your frames first, but most likely it isn’t in your best interest to do so. As tempting as it is to start unloading into that point frame right at your front door I wouldn’t usually advise it. Instead of looking at having initiative as being able to go first, think of it as having control over when you get to go. If you pass, you force one of your opponents to go and play their hand before you give up your precious few activations. This let’s you play more reactively and take advantage of beneficial situations as they present themselves. It takes a little practice to figure out when to jump the gun and activate your frames and when to hold off, but with a few games under your belt it should become easier.

Hopefully these will help you out on the table! If you have any other tips you’ve picked up be sure to let us know!

Frame Foundry: Efficiency in Odds

There are four things a frame can do in a turn and each one’s effectiveness is determined by die rolls. Being able to give yourself the best odds at succeeding at those tasks means building each one of your frames to be efficiently optimized at its specific role.
image

Before we start talking about optimizing your frames efficiently, let’s talk about playing efficiently for a moment. Since there are a limited amount of rounds in a game of MFZ and each frame only gets to activiate once per round, making the most out of each frame’s activation is the key to playing efficiently. Every activation you should be trying to move into a more advantageous position (moving into better cover, moving towards, defending, or capturing a station, putting pressure on an opponent to force them into a disadvantageous position, etc), defend, attack an enemy frame, and spot an enemy frame. If you can accomplish all of these things with every frame, every round, you’ll likely come out on top. To figure out what gives you the best odds to succeed at doing those things, we need to look at some numbers.

The following average results do not take into account using your white dice to replace rolls.

Single Weapon System: 4.47
Single Defense/Move/Spot: 3.50
Double Weapon System: 5.59
Double Defense/Move/Spot: 4.47
No Movement System with Sprint bonus: 4.50
Single Move with Sprint bonus: 5.28
Double Move with Sprint bonus: 5.59

You’ll notice that the single weapon system is the most effective single system due to the fact that it gives you two dice as opposed to all the other system’s single die. That means, from an efficiency standpoint, that every frame you have should have at minimum a single weapon system (there are exceptions to this. I’ll get to that later on). After the weapon systems, all of the three other system types give you equal odds, so grabbing one of each gives you the best overall odds at rolling well for all four stats. Add in your white dice to bolster the poor rolls and you have very high averages across the board as you aren’t relying on your white dice to supply you with any stat by themselves. This gives you the basic “soldier” loadout. Let’s look at how the numbers for a soldier pan out.

Direct fire: 4.47
Movement: 3.50
Defense: 3.50
Spot: 3.50

At first glance this may seem rather low, but remember that these don’t account for white dice being used to bolster lower rolls. Adding one white die to any category raises the average to 4.47, and adding a second raises it to 4.96. The fact that you can choose where to apply those dice after you roll means that they are always applied in the most efficient way, effectively giving you a 4.96 (or 5.24 in the case of the direct fire system) average on everything. That’s pretty darn efficient.

Having a backbone of soldiers in your company is extremely effective for playing efficiently, but only bringing soldiers is generally a bad idea. When you start building more specialized frames, it’s important to look at how removing or changing a system affects the effectiveness of the others beyond just looking at average rolls. For example, if you want an artillery specialist you could just swap the direct fire system for an artillery system and call it good, but that creates a problem. Your average rolls for spot may still be good, but it’s likely you won’t be in range to utilize them since you’ll want to hang back at artillery range. This gives you a couple of options. You could opt to drop the spot system all together and double up on another system. This can be a good move, but then it is even less likely that you will do all four actions each round, which is bad for efficiency. Or you can drop a movement or defense system for an additional spot system. This will make you reliant upon your white dice for neither defense or movement, but let’s you attack and spot from the other side of the table and increases your effectiveness at spotting (which is where the real damage comes from). I usually opt to ditch the defense system as a single system there doesn’t grant you any “non numerical” bonuses. A movement system will let you move over cover, so it’s more beneficial to have than a single defense. That leaves you with a single artillery, single move, double spot. Let’s take a look at what the numbers look like for this loadout.

Artillery: 4.47
Movement: 3.50
Defense (relying on a white die): 3.50
Spot: 4.47

Initially this looks fairly similar to the soldier as far as averages (which is good) but the only downside is that now you only have one white die to “float” to wherever it is needed. This gives you an effective average of 4.47 on move and defense and 4.96 on spot and artillery. Overall, this makes the averages slightly lower than the soldier, but you trade that for the capability to spot anywhere on the table. And in reality, the averages will be lower than that due to only one stat benefitting from that extra white die.

The important thing to note here is that your averages will drop whenever you don’t have a dedicated system. Let’s look at how having only two types of dedicated systems affects the numbers.

Here we have a double artillery, double spot frame.

Artillery: 5.59
Movement (relying on a white): 3.50
Defense (relying on a white): 3.50
Spot: 4.47

Here we’ve got really solid attack rolls and spot rolls, but the rest is really bad as you’re relying on a single white die for each with no chance of swapping out the bad rolls. You could decide not to move with this build, and it would up your defense average to 4.47, but then you’re unable to swap out any bad rolls on your spot or attack rolls as well. Basically the lack of floating white dice will really make you pay for any bad rolls that come up. This is the real penalty for over specializing.

One of the few times that not taking at least 3 different types of systems can still work out efficiently is when you involve SSRs and the Sprint bonus. Let’s look at an example of this.

This frame has double hand to hand, double defense, and an SSR.

Hand to Hand: 5.59
Direct Fire (with SSR): 4.50
Movement (sprint bonus): 4.50
Defense: 4.47
Spot (relying on a white die): 3.50

This frame is an assault frame, best used as the point frame of the primary attacker. Overall the averages are strong due to the sprint d8, and the doubled up systems. The SSR provides a way to dish out some damage (remember, efficiency!) while it closes in on its first target. It still only has one floating white die, but the stat most likely to suffer (the spot) is the least important for this build.

As you can see, building efficient frames is the first step in efficient play. Really looking at how the systems you select affects your dice rolls can improve your play drastically, and a lot of the time what seems like the most effective build is really sub par.

What have you found to be the most efficient frames for your play style?

*Note: I realize that some of the averages (especially involving floating white dice) are not 100% accurate. I’m not a mathematician or a stats guru, but the numbers provided are accurate enough for the comparisons above.

Table Talk: MFZ Isn’t a Wargame…

I’ve seen a lot of people get interested in Mobile Frame Zero because its a “tabletop wargame” with Lego. Technically, I suppose it is, but I don’t think we should be introducing it as such. The term “tabletop wargame” conjures up images of games like Warhammer, Warmachine, and the like. MFZ is only similar to those games in the broadest sense and actually shares more in common with games like X-Wing, Heroclix, or Mage Knight.

When new players are learning how to play MFZ and have the preconceived notions of traditional tabletop games in their heads, things generally don’t go so smoothly. “What do you mean there’s no line of fire?” “Facing doesn’t matter either?” “Why doesn’t my artillery do splash damage?” These players still are thinking with their previous wargaming experience instead of approaching MFZ with an open mind. I try to tell players that are learning the game that they can’t play MFZ like other games.

One of the things that tends to throw people off is playing with three players. This is extremely unusual for the tabletop genre and can be off putting for the traditional tabletopper. The potential (and downright assuredness) that someone will be getting ganged up on is usually seen as a negative in most games. But MFZ is meant to be asymmetrical, and in fact is balanced in a way that almost requires it.

I’ve seen many people try to add unnecessary complexity to the MFZ ruleset before even getting familiar with it. The tactics and depth in MFZ are not in the combat mechanics themselves, which is where most of the depth in traditional tabletop games comes from. In MFZ its in the decision making and the scoring system that bring the complexity and depth to the experience. Making tough choices like “do I give myself a defense of 2 to be able to move 6 to grab that objective and probably not survive? Or do I give myself the 6 defense and fall short of capturing the station but probably not take any damage?” are at the core of the MFZ experience. These are things that the traditional tabletop gamer isn’t used to doing, and it can be difficult to wrap ones head around a new concept like this while clinging to old gaming habits. Once people do learn to approach MFZ with a fresh set of eyes though, things start clicking.

Another thing to keep in mind is that contrary to many wargames, it is generally more beneficial to play the objectives in MFZ than to just shoot things. Destroying your opponent’s frames doesn’t get you points, it only reduces theirs. The only way to increase your score is to capture stations. Couple that with the comparably low level of lethality in MFZ compared to other games and playing the objective really becomes the most effective way to win.

With that, I think we should all stop introducing this wonderful game as a wargame, and start introducing it as a tactical board game, a strategy game of tough decisions and taking risks. When you get down to it, that’s the part that makes the game what it is. That’s the part that makes the game great.

Frame Foundry: System Clarity

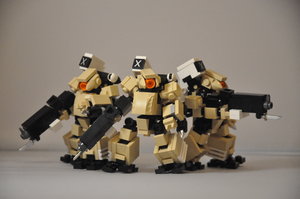
After building numerous frame companies and demoing the game to tons of people, I’ve really started to focus on keeping the systems on my builds as obvious and clear as possible. Building a frame where anyone unfamiliar with them can just look at it and the rest of the company and accurately guess what the loadouts are is an aspect of frame building that doesn’t get a ton of attention, and I think it should. Let me give you an example.

image

The Fat Snakes here are great aesthetically, but try to determine what the build is just by looking at them. The only clear things you can pull are that they have two weapon systems (the rifle and the pilebunker), and a SSR. Everything else is up in the air, and in fact, even the rifle is unclear. Does the bayonet on the rifle make it a split system? Is it just for show? Well, the loadout is 1 direct fire, 1 hand to hand, 1 defense, and 1 movement. Okay so we know what the weapons are now, but what about the others? Its pretty safe to assume the chest piece is the defensive system as that’s how the standard chub works, and you’d be correct there. But what about movement? Its actually the big feet for the legs. Which at first glance is fine, but what happens when you want a fat snake without a movement system? Now you either have to change the aesthetic by changing the leg design or have a frame that looks like it has a system that it doesn’t.

While experienced MFZ players may not have any trouble with having a company like this at the table, newer players probably will not remember what everything is, and with the community for MFZ still being very young chances are there is at least one newer player at your table.

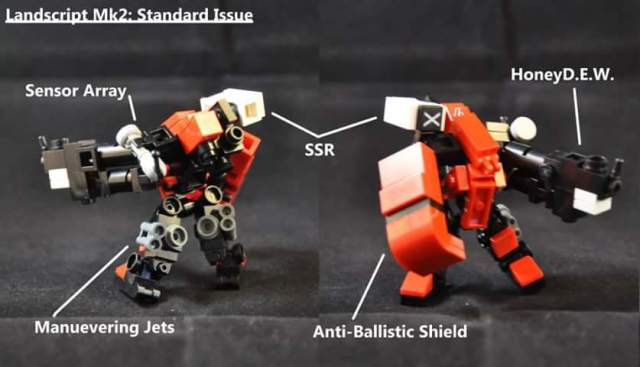
Now let’s take a look at a frame with very concise and clear systems.

image

Despite the fact that the picture above labels the systems, anyone looking at the frame would be very likely to guess every system correctly. Its also very clear as to what is the base frame and what are the systems. There aren’t any “integrated” systems that could confuse another player. When you have your systems designed like this it becomes very simple to create a similar aesthetic and unification across your whole company.

image

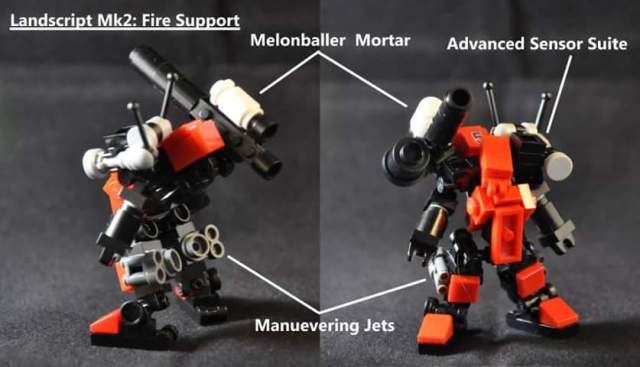
Here we have an artillery variant of the same frame. The direct fire weapon and defensive system have been removed and an artillery system was added to the back, using the larger size and positioning to imply an indirect fire weapon. Then by adding another module to the sensor, a second spotting system is created.

image

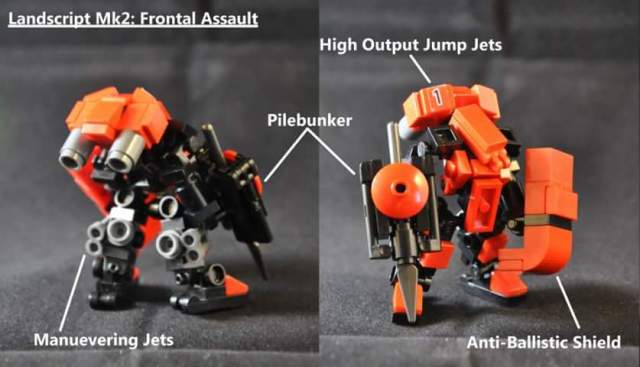
For this hand to hand focused variant we kept the movement and defensive systems and added a pilebunker for the hand to hand system. Then a large jump jet was added as an additional movement system. Again, everything is fairly obvious to someone unfamiliar with the frame.

So what’s the benefit of designing your company with these things in mind? The two biggest benefits are speed and ease of learning for new players. Both yourself and your opponents will know what’s on the table and what frames are capable of at a glance, which helps speed up decision making and dice rolls. Newer players will be able to focus on the rules of the game as opposed to trying to remember what the frame can do. Being able to get through a game with three brand new players in about an hour and a half is almost impossible without system clarity, and as someone who demos MFZ, time is invaluable.

What have you done to keep your systems and your frames recognizable?

Episode 4: The Free Colonies


episode4

It’s July! And since we celebrate the independence of our own free colony this month, it’s only fitting that we talk about the Free Colonies in this episode! We also discuss potential MFZ tournament structure and how to organize your company for it, system uniformity, basing your frames, how to use stations to your advantage, and the Hi Leg! There is a little more background noise in this recording but the audio should be much louder than the previous episodes. Thanks for listening!

Direct Download

Make sure to Like us on Facebook!

Episode 3: DCC Round Up and the Ijad

TransitGateEp3


Denver Comic Con is in the books, and it was a blast! After the Con, we sat down with Josh and talked about the event as well as some interesting facts about the Ijad and Intercept Orbit. We also delve into some tactics discussion with Josh about some unusual tactics that we were using in our games. Oh, and Ian almost dies.

Direct Download

Make sure to Like us on Facebook!

Quick DCC Wrap Up

With Denver Comic Con over, I wanted to give you guys a quick update on the event.

With attendance hitting over 25,000 just on Friday alone, the con was packed all weekend long. Josh, Soren, and the three of us were running demos of MFZ all throughout the con and people were very receptive, and by Sunday we had sold the last of the AQ’s stock of rulebooks (around 115) to eager con goers. I’m really looking forward to seeing some of those people over at the AQ in the future for a few games! We will be recording Episode 3 in the next few days and will likely have it up ahead of schedule, where Josh will be joining us to discuss the con and lots of other MFZ goodness, stay tuned!

DSC_0006


DCC Is Upon Us!

In just one short day, Denver Comic Con begins! We will be posting lots of pictures of the MFZ festivities at the con over the weekend over at our Facebook Page, so keep an eye out to see what we’ve got going on! Also, if you plan on joining us for the MFZ tournament, please make sure to check in at the Adventurer’s Quarter booth in the exhibitor hall on Friday to register. There is no registration fee, but we need to get everyone setup so we can organize the schedule for matches. Tournament matches will begin Saturday morning! Even if you’re not wanting to get involved with the tournament, bring your frames and get in a game with the Transit Gate crew or maybe even Joshua and Soren! Also, if you’re looking to get into the game and don’t have the Lego handy to build a company yourself we have some Custom Companies available for purchase at the AQ booth getting you everything you need to start playing besides dice!

Hope to see you at the con!

Episode 2: Getting Things Started


Episode 2

After a couple hiccups in the recording process, we finally got through episode 2. We talk about the successful funding of Intercept Orbit (formerly Alpha Bandit), the founding of the Solar Union, Lego terminology, Dice and Systems, and some tactics regarding the scoring system. Hope you enjoy! See you at the Denver Comic Con this weekend!

Direct Download

Make sure to Like us on Facebook!

Episode 1: Intros and Interviews

"Come Get Some!"

Here at The Transit Gate we like to start things out with a bang. In Episode 1 we have a very special guest, Joshua Newman, creator and publisher of MFZ and other games. We talk about his journey through the world of indie game design, pick his brain about his influences, and discuss the lifespan of MFZ thus far and going forward. First, we introduce ourselves, talk about what we love about MFZ, and fill you in on what to expect from the podcast going forward.

Direct Download

Go hit up the fan forums: The Mobile Frame Hangar

Make sure to check us out and like us on Facebook while you’re at it!

And go back the MFZ: Alpha Banidt Kickstarter too!